As we get ready for summer, it’s an excellent time to consider upgrading to luxury patio furniture brands sold by All American Outdoor Living. But if you have a sling-back chair that has seen better days, you can use this DIY guide to save you money and refresh your chairs.
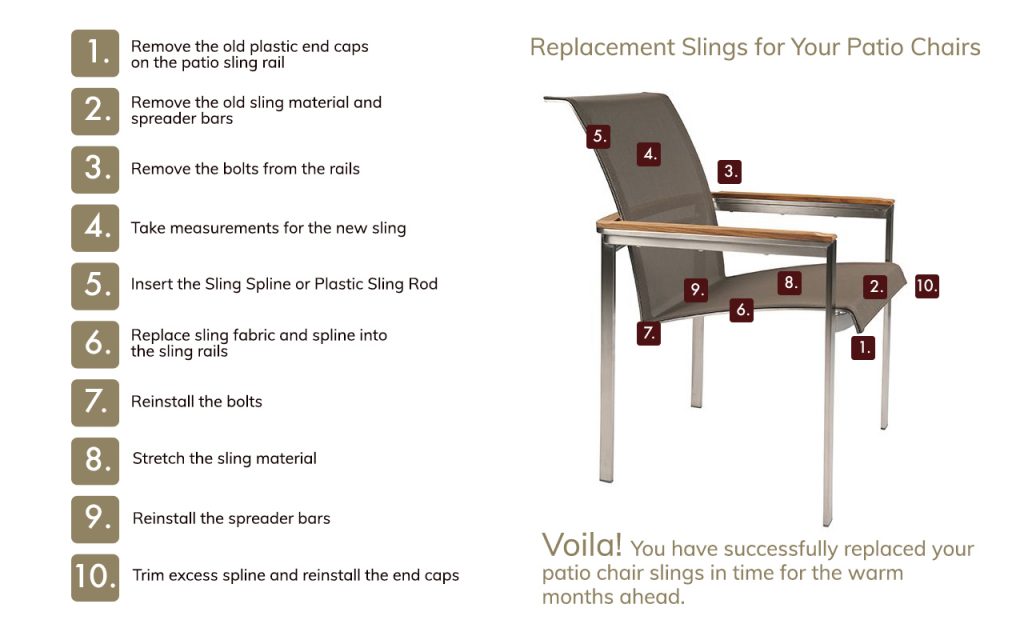
1. Remove the old plastic end caps on the patio sling rail
First and foremost, you need to disassemble your patio sling chair to install the new sling fabric. Remove the plastic end caps (plastic covers over the sling rails) from both ends of the sling rails with a flat head screwdriver or pliers. When removing your old end caps, be careful because they are often dry, brittle, and easy to crack. Take care not to damage them (you’ll need to remove them from both ends of the sling rails). Matching plastic caps can be difficult to locate depending on the manufacturer and color of your frames.
2. Remove the old sling material and spreader bars
It can be challenging to get the slings out of the rails at times. If the old slings are very old and have spent a lot of time in the sun, the plastic splines will be very brittle and rigid and will possibly break in chunks when you attempt to slide the old sling out of the rail. You’ll find that the new slings and splines are a breeze to install, particularly when compared to removing the old ones.
Remove each side of the old sling by slitting the fabric in the center. Cutting the old patio sling down the middle with a kitchen knife or heavy-duty scissors is the best way to get rid of it. Unbolt both sling rails before continuing if you don’t want to break your old slings by cutting them in half. The spreader bars, which are metal bars placed between the sling posts, must also be removed.
The sling sometimes becomes wedged inside the sling rail. Break the sling free by moving it back inside the sling rail with both hands. The fabric and plastic sling rod have been wedged up to the top of the rail opening due to the body’s weight lying on the old patio sling fabric.
This occurrence, combined with dirt and debris, gives the sling fabric’s edge the appearance of being glued in place. Spray some watered-down dish soap along the entire length of the sling rail to help loosen the sling and cloth. Allow the soapy mixture to work its magic for a few minutes. It takes some time to soak into the rail and dissolve the dirt and oils attached to the cloth.
There’s no need to preserve the sling rod or spline made out of plastic. As part of the kit, your new patio chair slings should come with a new supple sling rod. It’s doubtful that you’ll be able to reuse your old sling spline because it’s too dry and brittle. Re-threading the spline into the sewn rod pocket of your new replacement slings might be challenging.
The rusty, filthy fabric can easily slip out the sling rail’s bottom end. Grasp the sling with your hands or pliers and pull it away from the sling rail. Someone can keep the patio sling chair in place while someone else removes the old fabric from the rail.
If the old patio sling fabric is stubborn and won’t come free from the sling rail, use a flat head screwdriver to pry it loose. With the flat end of the screwdriver, force the patio sling fabric into the sling rail.
3. Remove the bolts from the rails
The plastic rod or spline threaded through the rod pockets on your new patio sling is held in place by the sling rails, which also support the edges of the new patio sling fabric. Bolts can secure one or both of the sling rails to the patio sling chair frame’s main body. The bolts are threaded into the chair frame via the sling rail. Remove all bolts (usually 4-6) from the patio chair frame with the required method.
Spray the bolts with a penetrating oil if they’re proving difficult to extract (Liquid Wrench, NAPA 6300). The oil would loosen any rust or corrosion on the bolt. Allow at least an hour for the oil to soak before continuing. Bolts and other hardware should be saved for reinstallation. It’s a safe idea to repair the bolts if they’re bent or rusted.
The bolt should not be forced out of the frame. You run the risk of snapping the bolts and potentially stripping out the threaded inserts, requiring additional frame repairs.
4. Take measurements for the new sling
To measure for new slings, take the width measurement while the old slings are still on, and measure the two rails from outside channel to outside channel (click for example) to the nearest 1/4″. The length of the old sling may generally be removed. We seldom use the width calculation by just measuring old slings after they’ve been replaced because we’ve noticed that the old slings are usually stretched or broken, and if new slings are the same width as the removed sling, they’re too loose. When ordering slings, always specify the width first, followed by the weight (width” x length”).
4. Insert the Sling Spline or Plastic Sling Rod
The new splines must first be mounted in the new slings’ side hems that fit into the sling rails. Feed the spline from one end, and it should feed all the way through. The new replacement slings are usually shipped without the plastic sling rod or sling spline installed.
Insert the sling spline into each side of the sling. The sling spline will be longer than necessary; do not trim away the excess until later in the installation process. If you are having trouble inserting the sling spline, try sharpening the end in a pencil sharpener. Insert the pencil into the opposite end of the sling or the end you are pushing toward. The pencil or pen will be pushed out in the future by the sling spline and not caught on the inner hem.
6. Replace sling fabric and spline into the sling rails
Ensure the rails are in the same place as when they were removed before slipping the sling into the rail. Slide the fabric through the sling rails, keeping the tag at the top of the chair to separate the top from the sling’s bottom.
Place one side of the sling into one of the sling rails (but not both) — then remove the sling rail entirely from the chair frame after the sling is mounted on one side — then install the new sling into the other sling rail that is still on the chair frame.
Last but not least, reattach the loose sling rail to the chair frame. By carefully gripping the ends of the fabric near the ends of the sling rail and gently tugging as you tighten the sling rail to the edge, you can progressively draw the material close to the ends of the sling rails.
7. Reinstall the bolts
Attach the sling rails to the chair frame with the newly mounted sling. Line up the holes and tighten all of the bolts with your fingers. Do not tighten the bolts all the way. You want to work your way around the chair and tighten each bolt a little bit at a time so the bolts tighten into the sling rails at the same rate. Do not fully tighten the bolts at this time.
Pull the sling until it is even with both sling rails, starting at the bottom of the chair. Tighten just the two bottom bolts until the sling is flush with BOTH sling rails. This action will hold the sling’s bottom in place and secure.
8. Stretch the sling material
Stretch the fabric upward to remove any wrinkles left in the bend of the seat. To stretch and pull the material through the sling rails, use a pair of pliers. Take care not to tear the fabric by of your sling chaise lounge by pulling too hard.
Since the fabric tends to slip back down the sling rail, it may be beneficial to use a pair of clamps to keep it in place. If you don’t have clamps, having someone to assist you with this move might be beneficial. Place your back against the chair. Stretch the sling upward to the edge of the sling rail with pliers until both the fabric and the sling rail are even. Using clamps or having someone keep the sling in place while you tighten the remaining bolts is a good idea at this stage. The sling should now be snug and wrinkle-free.
9. Reinstall the spreader bars
Installing a new sling and reassembling a chair is not difficult, but reinstalling the spreader bars can be challenging at times.
The spreader bar aims to hold the sling fabric taut. Spreader bars must be reinstalled if your chair came with them. Turn your chair sideways, taking care not to scratch the handles. Try bending the spreader bar just enough over your knee to allow it to fit into position. If you cannot turn the spreader bar, a spreader tool will be needed to spread the slings rails apart, allowing room for the spreader bar.
To avoid wrinkles in the fabric where the sling rails bend more sharply, the slings must also be extended in length. Pull at the sling ends nearest to the sling rail with the vise grips clamped on the thread (loosen the sling rail from the frame). Take extra caution here, as ripping the fabric is very easy if you pull too hard. Even the manufacturer has been known to tear the new sling during this phase, forcing them to discard it and try again with a new sling, so be extremely cautious. A few wrinkles won’t damage the fabric or its work, but a ripped sling can be incredibly inconvenient.
10. Trim excess spline and reinstall the end caps
Cut all excess sling spline with scissors, utility knife, or cutting, pliers, then gently tap end caps back onto sling rails with a rubber mallet.
Voila! You have successfully replaced your patio chair slings in time for the warm months ahead.